Tear and Share Picnic Bread

New term, new season and I’m feeling keen to get back in the kitchen and get my baking groove on.  The fact that The Great British Bake Off is back on tv also always inspires me to bake, bake, bake (it’s impossible to watch without feeling hungry so, to the great delight of my husband, we have weekly bakes of some description whilst it is on air).

I love making bread and have been doing a lot of pizza dough lately – after years of using the same pizza dough recipe and always having slightly floppy bases, I recently discovered Jamie Oliver’s basic pizza dough recipe and it has transformed my pizzas – shamazing – give it a try!!

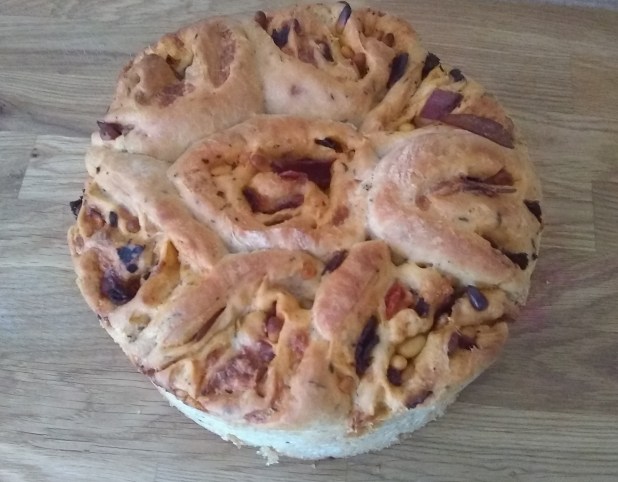
Anyway, I have an old Waitrose picnic bread recipe which I used to make years ago so I decided to give it a revamp and try some different flavour combos.  A nice alternative to our usual Saturday loaf and the children really like it so it’s win, win – I get to play and they get something scrummy and homemade!

img_20190602_184509087-e1569316577431.jpgIMG_20190602_184505377

Picnic Bread

  • 400g strong white bread flour
  • 7g packet dried yeast
  • 1.5 tsp salt
  • 3 tsp olive oil
  • 250ml luke warm water
  • dried herbs, if using

** for the filling I opted for sundried tomatoes (about 6 chopped), mozzarella (1 ball, torn up), grated parmesan (about 75g) and garlic (1 clove, pressed or chopped very small)**

  1. sieve the flour, yeast and salt into a large bowl and make a well in the centre – if you want to add any dried herbs, put them in  – I used oregano this time
  2. mix the oil with the water, pour into the flour mix and stir with a round bladed knife until you have a sticky dough
  3. turn out onto a floured surface, bring together and knead for a good 10 minutes until it feels silky and smooth
  4. place in a lightly oiled bowl, cover with a clean tea-towel and leave in a warm place (I always use my airing cupboard – oh, to have a proving drawer!) for 1-2 hours, until doubled in size
  5. **prepare your filling**
  6. Once it has risen, turn the dough out onto your floured surface and knock the air out
  7. using a rolling pin and/or your hands, roll and stretch the dough into a 30cm x 30cm square
  8. begin sprinkling and spreading your filling over the dough – make sure you go right to the edges
  9. roll the dough up so that you have a long cylinder and then gently squeeze it out along the length so that it measures approx. 50cm
  10. cut the roll into 8 equal sized pieces and place, end up, in a loose bottomed round cake tin
  11. cover and put back in your warm spot for another 45-60 minutes until it has risen to the top of the tin
  12. bake at 200 for about 35 minutes or until golden (sometimes I remove it from the tin at this stage and stick it back in the oven for a few minutes to colour the sides)
  13. Put it in the middle of the table so that everyone can admire your masterpiece – take a photo to impress your friends with – and then tear it up and EAT IT!!

xx


Carrot-jack Cheesecake

One of my big food loves is carrot cake, another is cheesecake – pretty much any flavour, any kind – baked or chilled I’m not at all fussy!  Anyway, I had heard about this new craze for carrot cake cheesecake and decided to have a bash at it.  However, my eldest is not a fan of carrot cake (with my genes?? don’t know what happened there!) but she will eat anything if it’s in a flapjack so I thought I’d create a whole new dessert.

IMG_20190418_094719156

It was pretty tasty if I do say so myself.  Here’s the recipe:

For the flapjack base

70g oats

40g brown sugar (white is fine if that’s what you have in the cupboard)

40g self raising flour

70g grated carrot (about 1 medium carrot)

30g walnut pieces

1 tbs golden syrup or honey

30g butter

  1. Mix the first 5 ingredients together.
  2. Melt the butter and syrup together and stir in.
  3. Press into a pie dish and bake for 10-12 mins at 180° until golden.

Allow to cool completely and then pile on the cheesecake topping …

For the topping

200ml double cream, whipped

70g icing sugar

1 tub Philadelphia or own brand cream cheese

1/2 tsp ground cinnamon

1 tsp vanilla essence

zest of a small orange or clementine

  1. Beat the cheese and add the icing sugar, cinnamon, vanilla and orange zest.
  2. Stir in the whipped cream, making sure it is fully mixed in.
  3. Plonk/bung/smooth it over the flapjack base and chill for a couple of hours.
  4. Enjoy!  And try not to eat too much, like me, or you will feel sick (but it was worth it)!


Lemon Scones

Sister X had got the lurgy this week so she couldn’t come along to Sister Y’s for a lemon fest – we had the fave Aldi special again and I’d made lemon scones under the pretence that they were for my husband and the workmen doing our kitchen up when they were actually for us … cunning!  Despite the fact that I’m always baking cakes, I think I’ve only ever made scones once before so it was a ‘fingers crossed’ effort!

IMG_20190322_124124185

  • 350g plain flour
  • pinch salt
  • 1 tsp baking powder
  • 85g butter, cubed
  • 3 tbs sugar
  • 1 egg, beaten
  • 150ml milk (the ‘classic scone’ recipe I was loosely following said 175ml but I wanted to add an egg as I had loads to use up so I put slightly less in)
  • zest of 1 lemon
  • beaten egg for glazing
  1. Combine the flour, salt and baking powder and rub in the butter until you have fine breadcrumbs.
  2. Stir in the sugar and lemon zest.
  3. Heat the milk until just warm (about 20/30 seconds in a microwave).
  4. Make a well in the centre of the dry ingredients and mix in the beaten egg and milk until you have a soft dough.
  5. Tip the dough out onto a floured surface and work it just a little until it all comes together.
  6. Pat or gently roll it out until about 3cm deep and get cutting! (a 5cm round cutter should get you about 8 scones but you can go bigger or smaller depending on preference).
  7. Place on a lined baking tray and cook for 12 minutes or until golden.

To serve

Lemon Curd

  • zest and juice of 2 lemons
  • 100g sugar
  • 50g butter
  • 2 eggs, beaten
  1. Place zest, juice, butter and sugar in a pan and melt over a low heat until the sugar has dissolved and the butter has melted.
  2. Whisk in the beaten eggs and keep gently whisking over the heat until thick.  Easy peasy!

. . . . add some whipped cream and you’re good to go!!  Enjoy.

IMG_20190322_124104982

Lemon drizzle and a sister MIA

Poor old Sister Y got stuck in a traffic jam this week and ended up having to turn around and go home (I’m sure there’s a song in there somewhere – ‘oh dear, what can the matter be, Sister Y is stuck ….’).  So Sister X came to mine for a cake lunch alone.  She brought the cake with her having been in a baking mood the previous day – bonus!!

Unfortunately, as usual, I forgot to take any photos but it was scrumptious.  She’s also forgotten to give me the recipe so I’m just going to assume it’s the same as mine, with the addition of a lime (why not?), and post that instead.

  • 150g self raising flour
  • 150g caster sugar
  • 100g butter (or flora buttery when you don’t have any!)
  • 4 tbs milk
  • 2 eggs
  • zest and juice of 1 lemon and 1 lime
  • 4 tbs extra sugar

Mix everything, bar the juices and extra sugar, together well.

Turn into a 1lb loaf tin and bake at 180 for about 40 minutes or until springy.

Meanwhile, mix the juices together with the extra sugar.

When it comes out of the oven, poke some holes (about half a dozen) in the cake with a skewer and spoon/drizzle the juice and sugar mixture over the top.

Allow to cool in the tin and then enjoy!

I decided to make one for the purposes of the photos but my children stepped in and insisted that we make it green and yellow for Spring and, as I have recently acquired some super duper gel colours that I hadn’t had much chance to play with, I wasn’t going to refuse!  So Sister X’s offering looked nothing like this peculiar creation (which was actually supposed to be striped but the oven obviously had other ideas) but tasted pretty similar so it’ll do!

wp_20190310_17_56_50_pro.jpg

Mugged Off!

It was cold last week – snowflakes actually fell for about 5 minutes – so we decided it was too chilly to go for walkies and that we should just go straight to tea and cake.  That and the fact that Sister X has recently had her kitchen renovated (by the Diet Coke Break men-children of previous blog post fame).  Myself and Sister Y thought it was high time we got to have a gander at it.  So we trotted round to where the posh people live and weren’t disappointed.  Very swanky indeed!  Sister Y and I, upon returning to our respective kitchens later that day, immediately began googling replacement kitchen doors and worktops.  Sister Y did mention something about tile paint – steady on girl – but it turns out that her eldest has a peculiar and very strong attachment to their current tiles, which are circa 1978!

As Sister X does not have an in-house bakery and we were desperate for cake, having not frequented any tea rooms for an outrageous number of weeks, I had the spiffing idea that we should make use of one of my Christmas presents – a Mug Cake cookbook.  What better way to experiment with messy microwave mug cooking than in someone else’s brand new kitchen?  Having flicked through, I was quite surprised by the amount of ingredients one is actually supposed to fit into the mug in order to make the cake, so I opted for a simple chocolate recipe which had the fewest.  Although few, the amounts of each still seemed rather excessive for one mug:

  • 5 tbs plain flour
  • 3 tbs caster sugar
  • 2 tbs cocoa powder
  • 1/2 tsp baking powder
  • 1 egg
  • 4 tbs chocolate spread (we only used 2)

I bagged up little ready-made mixes for us all and we duly made a horrendous mess on Sister X’s new island attempting to beat them all together in the mugs!  Then came the best part … Sister X let me play with her new microwave which is like something out of Star Trek – I’m easily pleased.


wp_20190124_11_24_43_pro.jpg
A bit of a mess but it tasted good!

The recipe said to heat for 50 seconds on high but they took more like 90 seconds each to cook through.  They weren’t pretty but they were tasty – very dense (probably should have put the extra chocolate spread in) and very rich.  None of us could actually finish a mug full which is saying something – you know how we love our cake!  Sister X did admit to having had another go at hers later that afternoon but figured she’d subsequently burned enough calories attempting to clean the mugs, upon which the fruits of our labour were well and truly caked – pun very much intended!!

wp_20190124_11_42_17_pro
Cooking didn’t improve its appearance!


No. 7 – Chez Moi and an Aldi special!

This week the weather was miserable and so the Sisters came to mine for lunch.  I was planning to try and recreate our afternoon tea from Prested Hall – without the frozen scones and stale sandwiches (or maybe with, just for an authentic experience!) – but decided it was too tall an order last minute so I opted for one of my current favourites: pasta in a creamy, cheesy pesto sauce with peas and garlic flatbread.  The pasta element is basically a steal from the Pioneer Woman  – https://thepioneerwoman.com/cooking/pasta-with-pesto-cream-sauce/ – with a few tweaks: walnut-basil pesto and cheddar as well as parmesan.  It is pretty yummy, and probably pretty calorific too!!

For the flatbread I used this recipe – https://www.recipetineats.com/easy-soft-flatbread-yeast/ – which is really easy and yeast-free.  These were premade and had already been fried so I just smothered it in garlic butter before letting it sizzle in the oven for 10 minutes.

wp_20181128_14_45_39_pro.jpg     WP_20181128_16_52_33_Pro

Sister Y’s offspring had finally forgiven her for her faux pas of last week and she celebrated by bringing her fave cake from Aldi – Sicilian Lemon Swiss Roll – which was really scrummy for a shop bought cake.  So scrummy, in fact, that we ate the whole lot .. oops!  To be fair, I did cut three modest portions but we decided there was no point leaving any for my lot to fight over so we did the sensible thing and polished it off!

aldi.jpg

So, carbed up to the max, we somehow got on to the subject of Theresa May’s dancing – don’t ask me how.  We don’t really do politics in the Sisterhood as we are all fairly different in our political views but we were all in firm agreement that, regardless of her performance on Brexit or other political conduct, we felt sorry for her on a purely human level with all the negative backlash.  The poor woman was basically damned if she did and damned if she didn’t.  Had she stood and watched, motionless and detached, people would have said she was boring and miserable.  So we of the Sisterhood applaud you, Theresa, for attempting to get your groove on and then being able to laugh at yourself for it (and obviously our opinion is of great importance) – ‘keeeeeeep dancing!’ xx

A bit on the side: Leftover Pumpkin Cake

Forgive me for I have sinned.  I have been eating cake without the Sisters!!  Actually, I have been baking, which I do most weeks for the Hungry Husband, but just wanted to share this for anyone who is trying to think up different ways to use up all those leftover pumpkins from Halloween.  We’ve done pumpkin pie and soup so I decided to make my favourite Carrot Cake recipe but swap the carrot for pumpkin.  It actually tastes pretty similar apart from being a bit more dense and squidgy – definitely a fork cake!

WP_20181107_14_20_10_Pro (2)

Here it is:

  • 3 cups pumpkin flesh
  • 2 cups self raising flour
  • 2 cups sugar (I only had white granulated but usually use light brown for this recipe)
  • 1 1/2 cups oil (I use sunflower)
  • 4 eggs
  • 2 tsp bicarb
  • 1 tsp salt
  • 1 tsp cinnamon (heaped) – I also added a teaspoon of nutmeg as pumpkin can be a bit bland
  • 1 tsp vanilla essence
  • 1 cup of chopped walnuts/pecans/almonds – whichever you have in the cupboard!
  1. I put the pumpkin flesh in the food processor on the regular chopping blade until it was in about the same size pieces as if it had been grated.
  2. Bung in everything else, apart from the nuts and whizz it up until nicely combined.
  3. Stir in the nuts.
  4. Pour into your prepared tin – I used a 25cm square one.
  5. Bake at 175 for about 50 minutes or until a skewer comes out clean.

Top with yummy cream cheese frosting:

  • 200g tub of cream cheese (philly or supermarket own brand, whichever you prefer or is cheaper!)
  • 1/4 cup margarine or butter
  • 1/2 kg of icing sugar
  1. Combine until smooth and spread over the cooled cake.
  2. Sprinkle with some ground cinnamon if it takes your fancy.
  3. Enjoy!